Nodar Cloud
Nodar Cloud is your gateway to:
- Nodar GT: Nodar's ground-truth-accurate depth estimation service
- Hammerhead: Nodar's real-time embedded solution
This guide explains:
- The inputs expected by Nodar Cloud
- The configuration required in your AWS ecosystem
- The output you can expect from us
To get started with Nodar Cloud, you'll need:
- A client ID and an AWS region where you will be deploying (contact sales@nodarsensor.com)
- The nodar script: Download Here
You can download a pdf of this documentation here
Accounts
To get started with Nodar Cloud, contact our sales team at sales@nodarsensor.com.
They will provide you with a customer ID (a UUID like b92b28ca-851f-40ae-861e-8ff672080f3c).
You will also need to specify which AWS region you will be accessing Nodar Cloud from (e.g. us-east-1).
Permissions
To use Nodar Cloud, you need to grant our principal role access to your S3 bucket. To do this, you should download the aforementioned nodar script and run
./nodar principalThe first time you run this command, you will be asked to enter your customer id and region. Afterward, those values are cached as
.client-idand.regionfor convenience (they should not change unless you have multiple accounts with us).
The command ./nodar principal will return the ARN of the role that needs access to your S3 bucket. E.g.:
EC2_ROLE_ARN: arn:aws:iam::YYYYYYGranting Access
To enable Nodar Cloud to operate on your S3 bucket,
you will need to add a bucket policy granting read/write access to the returned EC2_ROLE_ARN
(see https://docs.aws.amazon.com/AmazonS3/latest/userguide/add-bucket-policy.html).
To restrict that access to a specific prefix in an S3 bucket, like s3://my_bucket/test_data/boston,
you can use a policy like:
{
  "Version": "2012-10-17",
  "Statement": [
    {
      "Sid": "NodarEc2RoleListSpecificPrefix",
      "Effect": "Allow",
      "Principal": {
        "AWS": "EC2_ROLE_ARN"
      },
      "Action": "s3:ListBucket",
      "Resource": "arn:aws:s3:::my_bucket",
      "Condition": {
        "StringLike": {
          "s3:prefix": [
            "test_data/boston",
            "test_data/boston/*"
          ]
        }
      }
    },
    {
      "Sid": "NodarEc2RoleObjectAccessInPrefix",
      "Effect": "Allow",
      "Principal": {
        "AWS": "EC2_ROLE_ARN"
      },
      "Action": [
        "s3:GetObject",
        "s3:PutObject"
      ],
      "Resource": "arn:aws:s3:::my_bucket/test_data/boston/*"
    }
  ]
}
Note:
- You need to replace
EC2_ROLE_ARNwith the value returned by./nodar principal - You need to replace the fields
AWS,Resource, ands3:prefixwith the actual values in your bucket - The
boston/*pattern is recursive... it grants access to all objects underboston/, including nested subfolders likeboston/A/B/C/...
Once your bucket policy is in place, you can verify that permissions are correctly configured:
Verify Permissions (us-east-1) Verify Permissions (ap-southeast-2)
Synchronization
Nodar GT and Hammerhead use time-synchronized images to compute depth and disparity images. The accuracy of the time synchronization directly affects the accuracy of the generated images. For a detailed discussion of the synchronization requirements, please refer to:
The following table outlines the synchronization requirements for a camera mounted on a moving platform as a function of the field-of-view:
| Speeds | 30° FOV | 65° FOV | 135° FOV |
|---|---|---|---|
| Walking (4 kph / 2.5 mph) | 170μs | 390μs | 680μs |
| Running (10 kph / 6 mph) | 68μs | 150μs | 270μs |
| Urban driving (50 kph / 30 mph) | 14μs | 31μs | 54μs |
| Highway driving (120kph/ 70mph) | 5.6μs | 13μs | 23μs |
Input Format
Nodar Cloud assumes that your S3 data is organized in the following format:
config/
|- intrinsics.ini
|- extrinsics.ini
|- reprojection_config.ini
topbot/
|- 000000000.tiff
|- 000000001.tiff
|- ...topbot folder contains sequential images in the top-bottom format. That is,
topbot/123456789.tiff is an image with the following properties:
- The left camera image is in the top half of
topbot/123456789.tiff - The right camera image is in the bottom half of
topbot/123456789.tiff - The left and right camera image must both have an even number of rows and columns
- The image is either a BGR color image or raw Bayer tiff
Nodar Cloud has been tested on images with resolutions of up to 8.2 MP.
In regions with smaller GPU capacity (e.g. ap-southeast-2) only images of up to 4MP can be processed.
You can verify that your S3 data has the correct folder structure:
Verify Data Structure (us-east-1) Verify Data Structure (ap-southeast-2)
Pixel Format Support
Nodar Cloud supports both BGR color images and raw Bayer pattern images. When using the ./nodar start command, you can specify the pixel format using the --pixel-format parameter:
- BGR (default): Standard 3-channel images in BGR channel order (Blue-Green-Red)
- Bayer_RGGB: Raw Bayer pattern with Red-Green-Green-Blue layout (debayered to BGR)
- Bayer_GRBG: Raw Bayer pattern with Green-Red-Blue-Green layout (debayered to BGR)
- Bayer_BGGR: Raw Bayer pattern with Blue-Green-Green-Red layout (debayered to BGR)
- Bayer_GBRG: Raw Bayer pattern with Green-Blue-Red-Green layout (debayered to BGR)
Example usage:
./nodar start --s3-path s3://my-bucket/my-data/ --pixel-format Bayer_RGGBIf you don't specify --pixel-format, it defaults to BGR. All Bayer patterns are automatically debayered to BGR format for processing.
An example topbot/123456789.tiff might look something like:
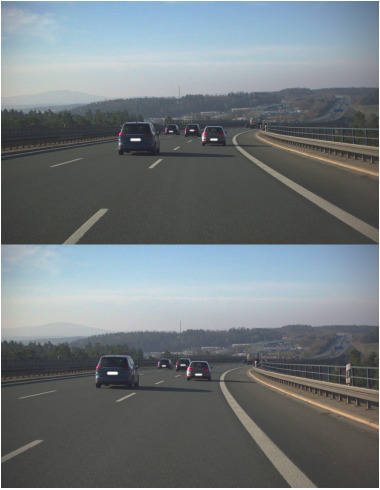
Note: We assume that the left and right camera images are synchronized. Poor synchronization will result in poor depth maps.
Config files
In addition to the images, we expect a config folder with the intrinsics.ini, extrinsics.ini,
and reprojection_config.ini files where:
intrinsics.iniis described in detail here. A valid example looks like:
You can verify that your intrinsics are correct by visually checking the undistortion on sample images:# [bool] Enable rectification enable_rectification = 1 # Camera Intrinsics # The following models are supported: # 0: OpenCV Pinhole Model # 1: OpenCV Fisheye Model i1_model = 0 i1_fx = 5368.72291 i1_fy = 5368.72291 i1_cx = 1458.95296 i1_cy = 936.28799 i1_k1 = -0.13332 i1_k2 = 0.98883 i1_k3 = -5.9473 i1_k4 = 0.0 i1_k5 = 0.0 i1_k6 = 0.0 i1_p1 = 0.001 i1_p2 = 0.00053 i2_model = 0 i2_fx = 5370.75916 i2_fy = 5370.75916 i2_cx = 1431.27415 i2_cy = 935.70973 i2_k1 = -0.13181 i2_k2 = 0.80715 i2_k3 = -3.7122 i2_k4 = 0.0 i2_k5 = 0.0 i2_k6 = 0.0 i2_p1 = -6e-05 i2_p2 = -0.00035
extrinsics.iniis described in detail here. A valid example looks like:
NOTE: ALL ANGLES (phi, theta, psi) INphi = 0 theta = 0 psi = 0 T1 = 1 T2 = 0 T3 = 0extrinsics.iniARE SPECIFIED IN DEGREES. TRANSLATION VALUES (T1, T2, T3) ARE SPECIFIED IN METERS.
You can visualize the camera positions defined by your extrinsics:
reprojection_config.iniis a file that tells Nodar Cloud how to adjust the rectification plane. For almost all customers, this file should contain the single line:
However, if you are supplying pre-rectified, then you should disable this projection:method = default
For wide FOV cameras the default OpenCV-based rectification can lead to large black areas and/or negative z-coordinates which is replaced by a modified rectification algorithm by using amethod = disabledreprojection_config.inithat contains:
# "opencv_rectification_fixed": uses a different rectification than standard open-cv
#   - clamps behind-camera points (Z >= 0.05) to avoid wide-FoV ROI corruption,
#   - always averages principal points when alpha >= 0 (regardless of zero_disparity),
#   - returns the actual computed output size.
method = opencv_rectification_fixed

# Viewport coverage control.
#   -1  = stock default (OpenCV auto-scale; focal length preserved).
#    0  = largest inscribed rectangle (all valid pixels visible, may crop corners).
#    1  = smallest circumscribed rectangle (no crop, but may add black borders).
alpha = 0.00

# Output image size.
#   0  = use input image size (default).
#  -1  = auto-compute this dimension from the other (preserves aspect ratio).
#        Supported by opencv_rectification_fixed only.
#  >0  = explicit pixel count.
# Only one dimension may be -1 at a time.
output_width  = -1
# Use output_height equal to your input image size, or a different size if so preferred
output_height = 1204
If you feel that these options (intrinsics, extrinsics, reprojection) are not broad enough to cover your specific use case, please contact support@nodarsensor.com.
Framewise Extrinsics and Intrinsics
Nodar Cloud supports framewise extrinsics. This is useful for scenarios where:
- You have an online calibration system that continuously updates extrinsics
- You do not want to use the online calibration system from Nodar
Nodar Cloud also supports framewise intrinsics. This is useful if you want to process data from different cameras in single jobs to avoid the instance spin-up time.
You can provide framewise-intrinsics and framewise-extrinsics both at the same time or only one (or none).
Both matchers, hammerhead and ground-truth, support framewise-extrinsics and -intrinsics.
Using Framewise Extrinsics
To use framewise extrinsics, add an extrinsics/ folder to your S3 data with per-frame extrinsics files:
config/
|- intrinsics.ini
|- extrinsics.ini
|- reprojection_config.ini
extrinsics/
|- 000000000.yaml
|- 000000001.yaml
|- ...
topbot/
|- 000000000.tiff
|- 000000001.tiff
|- ...
Each extrinsics file should be named to match its corresponding topbot image (e.g., extrinsics/000000010.yaml for topbot/000000010.tiff) and contain the extrinsic parameters in YAML format:
phi: 0.0
theta: 0.0
psi: 0.0
T1: 1.0
T2: 0.0
T3: 0.0
The parameters follow the same convention as config/extrinsics.ini
NOTE: The YAML format uses colons (:) instead of equals signs (=) used in the .ini file. ALL ANGLES (phi, theta, psi) ARE SPECIFIED IN DEGREES. TRANSLATION VALUES (T1, T2, T3) ARE SPECIFIED IN METERS.
To enable framewise extrinsics processing, pass the --framewise-extrinsics flag in the --flags parameter when starting a job:
./nodar start --s3-path s3://my-bucket/my-data/ --flags "--save-left-disparity --save-details --save-left-rectified --framewise-extrinsics"When this flag is enabled:
- Nodar Cloud will look for per-frame extrinsics in the
extrinsics/folder - Each frame will be processed using its corresponding extrinsics file exactly as provided (without online autocalibration refinement)
- If a framewise extrinsics file is not found for a particular frame, the job will fail with an error
Using Framewise Intrinsics
To use framewise intrinsics the following requirements must be met:
- Add an
intrinsics/folder to your S3 data with one{frame_id:09d}.yamlfile per image
config/
|- intrinsics.ini
|- extrinsics.ini
|- reprojection_config.ini
intrinsics/
|- 000000000.yaml
|- 000000001.yaml
|- ...
topbot/
|- 000000000.tiff
|- 000000001.tiff
|- ...
Each intrinsics file must be named to match its corresponding topbot image, and contain intrinsic parameters in the following YAML format (same as the .ini file, but with : instead of =):
i1_model: 0
i1_fx: 1472.12255859375
i1_fy: 1472.113250891
i1_cx: 958.480224609375
i1_cy: 604.8082885742188
i1_k1: -0.290271550416946
i1_k2: 0.13943581283092502
i1_k3: -0.046248171478509
i1_k4: 0.0
i1_k5: 0.0
i1_k6: 0.0
i1_p1: 0.00010690901399300001
i1_p2: -0.000121873687021
i2_model: 0
i2_fx: 1466.674072265625
i2_fy: 1466.674072265625
i2_cx: 956.5911254882812
i2_cy: 604.0540161132812
i2_k1: -0.289349615573883
i2_k2: 0.137299060821533
i2_k3: -0.044449813663959004
i2_k4: 0.0
i2_k5: 0.0
i2_k6: 0.0
i2_p1: 0.00021743879187800002
i2_p2: -0.00021673391165600003
The i1_model and i2_model fields must be integers, the other fields are interpreted as double.
The *_model value must be either 0 or 1:
0: OpenCV Pinhole Model
1: OpenCV Fisheye Model
The meaning of the other parameters are:
- fx, fy: The focal lengths of the camera, expressed in pixel units along the x and y axes. They determine the image's scaling and the field of view.
- cx, cy: The coordinates of the principal point (optical center) in pixels - representing the point where the optical axis intersects the image plane.
- k1-k6: Radial distortion coefficients. They model the "barrel" or "pincushion" distortion introduced by the lens.
- p1, p2: Tangential distortion coefficients that account for slight lens or sensor misalignment.
To enable framewise intrinsics processing, pass the --framewise-intrinsics flag in the --flags parameter when starting a job:
./nodar start --s3-path s3://my-bucket/my-data/ --flags "--save-left-disparity --save-details --save-left-rectified --framewise-intrinsics"where s3://my-bucket/my-data/ must contain intrinsics/, topbot/, and config/ (and extrinsics/ if so desired).
"Sequential" Images
In the current version of the cloud API, we require sequential, fairly regularly spaced data. That is to say...
- 3Hz data does not need to be precisely 3Hz
- 10Hz data does not need to be precisely 10Hz
For example, if the data was 10Hz, timings of
0.10, 0.22, 0.31,..
would be fine.
However, generally speaking, we expect (and have extensively tested) timing irregularities on the order of tens or hundreds of milliseconds. If you are in the situation where there are large breaks of minutes or hours in the data, then it is our intention that that data should be split into 2 folders and processed in separate runs.
In the future, we will remove this requirement for the GroundTruth service.
Output Format
Given an S3 path with inputs in the correct format (see Input Format), Nodar Cloud will generate outputs in the same folder organized by matcher type and execution ID. That is, when finished, your folder could contain the following data:
nodar-gt/                         # for ground-truth matcher
|- executions/
   |- {execution-id}/
      |- details/
      |  |- 000000000.yaml
      |  |- ...
      |- disparity/               # left-disparity
      |  |- 000000000.tiff
      |  |- ...
      |- left-rect/
      |  |- 000000000.tiff
      |  |- ...
      |- point_clouds/
      |  |- 000000000.laz
      |  |- ...
      |- right-disparity/
      |  |- 000000000.tiff
      |  |- ...
      |- right-rect/
      |  |- 000000000.tiff
      |  |- ...
nodar-hh/                         # for hammerhead matcher
|- executions/
   |- {execution-id}/
      ...
The exact output will depend on the flags you pass to the nodar script, as we describe in the Using Nodar Cloud section.
Note:
- Rectified images (like the left-rectified images in
left-rect) are saved as RGB tiffs - The
detailsfolder contains yaml files with reprojection and rotation matrices necessary for creating point clouds - If requested, the
xyzrgbpoint clouds are saved in the LAZ format
Using Nodar Cloud
The nodar script is the primary interface to Nodar Cloud. You should download the script and make it executable:
chmod +x nodar There are 5 main ways that you will use this script:
./nodar principal
./nodar start --s3-path S3_PATH [other options]
./nodar stop --execution-id EXECUTION_ID
./nodar status --execution-id EXECUTION_ID
./nodar [succeeded,failed,running,timed-out,aborted]
Specifically:
./nodar principalprovides you with the ARN of the role that needs access to your S3 bucket (see Permissions)../nodar startstarts an execution of Nodar Cloud on a specified S3 path and returns an execution ID./nodar stopstops a specific execution./nodar statusgets the status of an execution./nodar [succeeded,failed,running,timed-out,aborted]returns the list of executions that have the specified status
Note that the first time you run any of these commands,
you will be asked to enter your customer id and region.
Afterward, those values are cached as .client-id and .region for convenience.
They should not change unless you have multiple accounts with us.
For a full list of options, you can always append the --help flag. For example:
~$ ./nodar principal --help
usage: nodar principal [-h] [--client-id ID] [--region REGION]

options:
  -h, --help       show this help message and exit
  --client-id ID   Customer UUID v4
  --region REGION  AWS Region (e.g. us-east-1)
~$ ./nodar start --help
usage: nodar start [-h] [--client-id ID] [--region REGION] [--s3-path S3_PATH]
[--start-frame FRAME] [--frame-count COUNT]
[--matcher MATCHER] [--pixel-format FMT] [--max-disp DISP]
[--flags FLAGS] [--force-reprocess]
[s3_path]
Start execution.
s3_path is either a single s3://bucket/prefix dataset, or a path to a
local JSON manifest file listing several datasets to process
sequentially in one job:
{"datasets": [{"s3_path": "s3://bucket/run1/"}, {"s3_path": "s3://bucket/run2/", "matcher": "hammerhead"}]}
Every field except s3_path is optional per dataset; whatever a dataset
omits falls back to this command's own flags below (--matcher, --flags,
etc), same as a single-dataset run.
positional arguments:
s3_path S3 path like s3://bucket/prefix, or a local manifest.json for a batch of datasets (default: None)
options:
-h, --help show this help message and exit
--client-id ID Customer UUID v4 (default: None)
--region REGION AWS Region (e.g. us-east-1) (default: None)
--s3-path S3_PATH S3 path like s3://bucket/prefix, or a local manifest.json for a batch of datasets (default: None)
--start-frame FRAME Starting frame number. Batch-wide default for any manifest dataset that omits start_frame. (default: 0)
--frame-count COUNT Number of frames to process where -1 denotes 'all frames'. Batch-wide default for any manifest dataset that omits frame_count. (default: -1)
--matcher MATCHER Matcher type: 'ground-truth' or 'hammerhead'. Batch-wide default for any manifest dataset that omits matcher. (default: ground-truth)
--pixel-format FMT Input image pixel format: BGR, Bayer_RGGB, Bayer_GRBG, Bayer_BGGR, Bayer_GBRG. Batch-wide default for any manifest dataset that omits pixel_format. (default: BGR)
--max-disp DISP Maximum disparity. Must be a multiple of 32, up to 608. 0 means use the model default (416). Batch-wide default for any manifest dataset that omits max_disp. (default: 0)
--flags FLAGS Processing flags (space-separated).
Common:
--save-left-disparity
--save-right-disparity
--save-left-rectified
--save-right-rectified
--save-left-valid-pixel-map
--save-right-valid-pixel-map
--save-details
--save-pc
--disable-autocal
--framewise-extrinsics
--framewise-intrinsics
--debayer=alleysson
--normalize
Hammerhead Only (since ground-truth does not generate confidence maps):
--save-left-confidence-map
--save-right-confidence-map
Batch-wide default for any manifest dataset that omits flags.
(default: --save-left-disparity --save-details --save-left-rectified)
--force-reprocess Reprocess even if results already exist in S3 for a dataset. By default,
if a prior execution's outputs are already present -- whether complete or a
partial/crashed run -- that dataset is not submitted, so it can be inspected
first. In a batch, only the not-yet-processed datasets are submitted. (default: False)~$ ./nodar stop --help
usage: nodar stop [-h] [--client-id ID] [--region REGION] [--execution-id XID]
[execution_id]
positional arguments:
execution_id Execution ID
options:
-h, --help show this help message and exit
--client-id ID Customer UUID v4
--region REGION AWS Region (e.g. us-east-1)
--execution-id XID Execution IDPlease note that the arguments passed as --flags need to be surrounded by ", e.g.
./nodar start --matcher ground-truth --flags "--save-details --save-left-disparity --save-left-rectified --save-right-disparity --save-right-rectified --save-left-valid-pixel-map --save-right-valid-pixel-map --save-pc" s3://path-to-s3-bucket/shared/with/nodarBatch / Multi-Dataset Runs
Instead of a single s3://... path, ./nodar start also accepts a path to a local
JSON manifest file listing multiple S3 datasets. They are processed sequentially in
one job, without relaunching the GPU instance between datasets - useful for
amortizing the (multi-minute) instance boot time across many smaller datasets or
when it is difficult to get an instance in the first place so several datatsets can
be processed without having to wait for the next instance.
{
  "datasets": [
    { "s3_path": "s3://bucket/run1/", "start_frame": "0", "frame_count": "-1",
      "matcher": "ground-truth", "flags": "--save-left-disparity --save-details",
      "pixel_format": "BGR", "max_disp": "0" },
    { "s3_path": "s3://bucket/run2/" }
  ]
}
Every field except s3_path is optional per dataset; anything a dataset omits falls
back to whatever you passed on the command line (e.g. --matcher, --flags), the
same defaults used for a single-dataset run.
./nodar start manifest.json --matcher ground-truth --flags "--save-left-disparity --save-details"Notes:
- All datasets in a manifest must belong to you and be in the same AWS region your
nodarclient is configured for. - Datasets are assumed (not validated) to share the same image resolution - the GPU instance is sized once, from the largest image found across the whole batch, to avoid out-of-memory errors on a later, larger dataset.
- If one dataset fails, the batch continues on to the remaining datasets rather than
aborting outright, so a problem with one dataset doesn't waste the GPU time already
committed to the others.
./nodar statusreports which dataset is currently active. Running./nodar stopon a batch execution stops it before the next dataset starts (the dataset already in progress still runs to completion or failure on its own). - The manifest itself, and each dataset's in-progress status file, are written under
that dataset's own S3 prefix (
nodar-manifests/,nodar-status/) - already covered by the bucket policy described in Permissions; no extra access needs to be granted. - A maximum of 25 datasets can be submitted per manifest
Skipping Already-Processed Datasets
By default, ./nodar start will not resubmit a dataset whose results are already in
S3, so you don't pay for the same GPU work twice. Before starting, it inspects the
dataset's output folder (nodar-gt/ or nodar-hh/) and classifies it:
| State | When | Without --force-reprocess |
|---|---|---|
| None | No prior outputs found (also the result if S3 can't be read) | Runs normally |
| Complete | A prior execution already has every requested output for every requested frame | Skipped |
| Incomplete | A prior execution has some outputs but not all frames (e.g. a run that crashed part-way) | Not run, and flagged with a ⚠️ warning so you can inspect it first |
Pass --force-reprocess to ./nodar start in case you want to run if you need additional outputs to be saved.
Results always go to a new execution folder,
so a reprocess never overwrites the existing ones. In a batch/manifest run the check
is applied per dataset, and only the not-yet-processed datasets are submitted; if an
incomplete prior run blocked something, ./nodar start exits non-zero (3).
CAUTION: if several ./nodar start ... commands are executed before an instance has started and results were written (which takes about 6 min), the check if results already exist will yield none, so multiple executions of the same job can still happen!
Please do not execute ./nodar start ... on the same data set within the boot-up period (of 6 minutes).
Job Status
./nodar status --execution-id EXECUTION_ID prints where your job is in its lifecycle:
| Status | Meaning |
|---|---|
RUNNING_WAITING_FOR_EC2_INSTANCE |
Accepted, waiting for a GPU instance to be granted. Nodar Cloud retries for a few minutes when a region is temporarily at capacity, so a job may sit here briefly right after you start it (more likely in smaller-capacity regions) — no action needed. If capacity can't be secured, the job ends as FAILED and is usually worth retrying. |
RUNNING |
A GPU instance has been granted and is waiting to be ready. |
RUNNING with progress and ETA |
A GPU instance is up and your frames are being processed; results start appearing in S3. |
SUCCEEDED |
Finished successfully — every frame was processed. |
FAILED |
Did not complete. This includes a processing run that exited with an error partway through (see Exit Codes to tell a capacity failure apart from a processing failure). |
TIMED_OUT / ABORTED |
Exceeded its time budget, or was stopped (e.g. via ./nodar stop). |
Note that RUNNING_WAITING_FOR_EC2_INSTANCE means no instance is processing your data yet —
unlike plain RUNNING.
A job whose processing errors out is reported as FAILED (not SUCCEEDED), based on a
terminal result the container records to your S3 path on exit. In the rare case where the
processing host is killed abruptly (e.g. a hard out-of-memory kill) before that result is
recorded, the job can still be reported as SUCCEEDED even though it did not finish — so
also confirm the expected outputs are present in your S3 path before relying on a
SUCCEEDED result.
Exit Codes
./nodar status returns a process exit code, so it can be used directly in scripts:
| Code | Meaning |
|---|---|
| 0 | Success - the execution SUCCEEDED |
| 1 | A generic failure - the execution FAILED partway through processing (the processing exited with an error, or the status request itself failed) |
| 2 | The execution FAILED because the EC2 instance or its container never started - e.g. a transient capacity issue. Often worth retrying. |
If a job has failed, please double check all arguments given to the nodar start command, e.g. if --pixel-format ... has been given if Bayered topbot images were provided.
Output Types
When you start a Nodar Cloud execution, you can control which outputs are generated using the --flags option.
Each flag enables saving a particular output type to your S3 path. The following describes what each one produces:
Disparity Maps
--save-left-disparity:
Saves the left disparity map as a single-channel image.
Each pixel represents the horizontal offset (in pixels) to the matching point in the right rectified image.
--save-right-disparity:
Saves the right disparity map as a single-channel image.
Each pixel represents the horizontal offset (in pixels) to the matching point in the left rectified image.
The Hammerhead disparity maps are stored as 16-bit unsigned integers (uint16) with 4-bit subpixel refinement. This means that disparity values are scaled by a factor of 16. For example, a disparity of 100 corresponds to a stored value of 1600, while a disparity of 101 corresponds to 1616. To obtain the true disparity, divide the stored value by 16.
Ground-truth disparity maps are stored as 16-bit unsigned integers (uint16), same as Hammerhead outputs. The same scaling factor of 16 is applied to the ground-truth data.
Rectified Images
--save-left-rectified:
Saves the rectified left image, that is,
the left image transformed such that corresponding points in the left and right rectified images lie in the same row.
--save-right-rectified:
Saves the rectified right image, that is,
the right image transformed such that corresponding points in the left and right rectified images lie in the same row.
Confidence Maps
The ground-truth matcher currently does not produce confidence estimates,
while the hammerhead matcher does.
When using hammerhead, you can enable saving confidence maps,
which represent how certain the algorithm is about each pixel’s correspondence in the disparity map.
Confidence is derived from the difference between the best and second-best matching costs,
mapped to grayscale values.
Bright pixels indicate high confidence, where the best match is clearly better than the alternatives. Dark pixels indicate low confidence, often found in low-texture and repetitive areas like sky, walls, or asphalt.
--save-left-confidence-map:
Saves the confidence map for the left disparity map.
--save-right-confidence-map:
Saves the confidence map for the right disparity map.
Valid Pixel Maps
--save-left-valid-pixel-map:
Saves a binary mask indicating which pixels in the left disparity map have valid disparity values. Invalid or missing disparities are marked as 0.
--save-right-valid-pixel-map:
Saves a binary mask indicating which pixels in the right disparity map have valid disparity values. Invalid or missing disparities are marked as 0.
Additional Outputs
--save-details:
Saves an additional diagnostic yaml for each output frame.
This yaml includes rotation matrices, camera baseline, focal length,
and other high-level metadata that is useful for debugging and/or analysis.
--save-pc:
Saves reconstructed point clouds derived from the disparity map and camera calibration.
The data is saved in the LAZ format.
Each point represents a 3D coordinate in the camera reference frame with RGB color information.
Image Preprocessing
These two flags do not add an output of their own. They change how the input images are prepared before matching, and therefore affect every output you have enabled, including the saved rectified images.
--debayer=alleysson:
Demosaics Bayer input with a linear frequency-domain (Alleysson) reconstruction
instead of the default bilinear interpolation.
It suppresses the color noise and maze-like artifacts that bilinear demosaicing produces
in dark or low-contrast scenes.
Only has an effect together with a Bayer --pixel-format; it is ignored for BGR input.
--normalize:
Applies a log-average luminance tonemap that lifts shadow detail
before it is lost to the 8-bit reduction inside the matcher.
Useful for underexposed or high-dynamic-range scenes.
The tone curve is computed once across both cameras, so left and right stay photometrically matched.
Requires a color image: with a Bayer --pixel-format, pass --debayer=alleysson as well.
Startup time
Note that the internal EC2 instance will take a few minutes to start up (5-10 minutes).
Obvious errors will be reported in a few seconds.
However, if your process reaches the running state,
it will take a few minutes before you start seeing results in your S3 bucket.
For this reason, it is preferable to do a single long run of data
rather than a series of short runs.
Initial Calibration
Stereo cameras require accurate calibration of both their intrinsic and extrinsic parameters. You can use the intrinsics checker to visually verify your calibration by undistorting sample images:
If you need help with calibration, please contact support@nodarsensor.com for support.